Sunday, January 10, 2010

Make vs Ant

Ant was developed mainly to run java programs, so it is good at building and running java programs. But you can use the good all Make program to build and even run java programs.

Say I have an ant file that will

  1. Clean the build - ant clean

  2. Compile - ant compile

  3. Make a Jar - ant jar

  4. Run - ant run or simply ant


For this, I will only compile one java file name src/test/HelloWorld.java
<project name="HelloWorld" basedir="." default="main">

<property name="src.dir" value="src"/>

<property name="build.dir" value="build"/>
<property name="classes.dir" value="${build.dir}/classes"/>

<property name="jar.dir" value="${build.dir}/jar"/>
<property name="main-class" value="test.HelloWorld"/>

<target name="clean">
<delete dir="${build.dir}"/>
</target>

<target name="compile">
<mkdir dir="${classes.dir}"/>
<javac srcdir="${src.dir}" destdir="${classes.dir}"/>

</target>

<target name="jar" depends="compile">
<mkdir dir="${jar.dir}"/>

<jar destfile="${jar.dir}/${ant.project.name}.jar" basedir="${classes.dir}">
<manifest>
<attribute name="Main-Class" value="${main-class}"/>

</manifest>
</jar>
</target>

<target name="run" depends="jar">

<java jar="${jar.dir}/${ant.project.name}.jar" fork="true"/>
</target>

<target name="clean-build" depends="clean,jar"/>

<target name="main" depends="clean,run"/>

</project>

If you want to learn what each line of this means, just follow the excellent ant tutorial at http://ant.apache.org/manual/tutorial-HelloWorldWithAnt.html.

Here is the Makefile that will do the above tasks,
SRC_DIR=src
BUILD_DIR=build
CLASSES_DIR=$(BUILD_DIR)/classes
JAR_DIR=$(BUILD_DIR)/jar

PROJECT=HelloWorld
MAIN_CLASS=test.HelloWorld
PACKAGE=test
 
run: clean jar
java -jar $(JAR_DIR)/$(PROJECT).jar
 

jar: $(JAR_DIR)/$(PROJECT).jar
 
$(JAR_DIR)/$(PROJECT).jar: $(CLASSES_DIR)/$(PACKAGE)/*.class
echo Main-Class: $(MAIN_CLASS)> mf
test -d $(JAR_DIR) | mkdir -p $(JAR_DIR)

jar cfm $@ mf -C $(CLASSES_DIR) .
 
compile: $(CLASSES_DIR)/$(PACKAGE)/*.class

 
$(CLASSES_DIR)/$(PACKAGE)/%.class: ${SRC_DIR}/$(PACKAGE)/*.java
test -d $(CLASSES_DIR) | mkdir -p $(CLASSES_DIR)

javac -sourcepath src -d ${CLASSES_DIR} $<
 
clean:
rm -rf build mf

You may notice I had to provide the package name to the compile command, as it doesn't have a proper wildcards to represent the jar. Similar to ant all these make tasks will execute only if it is required. i.e. for an example if all the .class files are up to date with .java it will not try to recompile it.

Friday, January 08, 2010

WSF/PHP Code First Approach: Returning an Array of String

Here is a problem that many people have asked me how to do it. "Returning an array of string" with the code first approach. The API or WSDL generation annotation guide, http://wso2.org/project/wsf/php/2.0.0/docs/wsdl_generation_api.html contain all the things required in details. Here is an example of a service that return an array of string.
<?php

/** splitMe function
* @param string $string_to_split string to split
* (maps to the xs:string XML schema type )
* @return array of string $result split to array
*(maps to the xs:double XML schema type )
*/

function splitMe($string_to_split)
{
return array("result" => split(":", $string_to_split));

}

$operations = array("splitMe"=>"splitMe");
$opParams = array("splitMe"=>"MIXED");

$svr = new WSService(array("operations"=>$operations,
"bindingStyle"=>"doclit",
"opParams"=>$opParams));

$svr->reply();
?>

Note that the annotation corresponding to the return value.
 * @return array of spring $result split to array

This will generate an schema with an element of maxOccurs='unbounded'. Note that you can get the wsdl from the 'serviceurl?wsdl'.
<xsd:element name="splitMeResponse">
<xsd:complexType>
<xsd:sequence>
<xsd:element name="result" maxOccurs="unbounded" type="xsd:string"/>
</xsd:sequence>
</xsd:complexType>
</xsd:element>

Now just generate a client for this service using wsdl2php and try invoke it. You will get an array of string as the response.
    $input = new splitMe();
$input->string_to_split = "a:b:c:d";

 
// call the operation
$response = $proxy->splitMe($input);
print_r($response);

Thursday, January 07, 2010

Writing Business Rules in WSO2 Carbon Platform

If you want to write rules in a Java program you have lot of choices. You can use a third party library like Drools or use the JAVA built-in JSR-94 reference implementation. In WSO2 Carbon, there is a component that abstract the behaviour of different rule engine and give you a unified API. Currently it has plugged into Drools and JAVA built-in JSR-94 implementation.

The rule component in WSO2 Carbon platform mainly used by WSO2 ESB product to mediate messages according to the given business rules. But the component is written to facilitate any requirement of using business rules in WSO2 Carbon platform. I had such a requirement in past few days and manage to use the rule component easily with the help of the component author, indika@wso2.com. So I thought it is worth sharing my experience in here.

Here You will be preparing the following stuff.

1. Rule configuration -

We can use this to provide the information about the rule implementation we are going to use, the rules (You can write rules inline or provide a reference to an external file) and the input and output adapter information.
<configuration xmlns="http://www.wso2.org/products/rule/drools">
<executionSet uri="simpleItemRuleXML">
<source key="file:src/test/resources/rules/simple-rules.drl"/>

<!-- <source>

<x><![CDATA[
rule InvokeABC
// rules inbuilt to the rule conf
end

]]>
</x>
</source> -->
<creation>
<property name="source" value="drl"/>

</creation>
</executionSet>
<session type="stateless"/>
<input name="facts" type="itemData" key="dataContext"></input>

<output name="results" type="itemData" key="dataContext"></output>
</configuration>


2. The Rules  -

You can write rules inline in the above configuration or put it in a file and refer it from a key which can be refered from the ResourceHelper (described below).
import java.util.Calendar;

rule YearEndDiscount
when
$item : org.test.pojo.SimpleItem(price > 100 )

then

Calendar calendar = Calendar.getInstance();
if (calendar.get(Calendar.MONTH) == Calendar.JANUARY) {

$item.setPrice($item.getPrice() * 80/100);
}

end

3. Data Context -

The context object that can be used to feed and retrieve data from and to rule engine. Here is the data context for my application.
public class SimpleDataContext {

public List<NameValuePair> getInput() {

// in reality the data will be retrieve from a database or some datasource
List<NameValuePair> itemPairList = new ArrayList<NameValuePair>();
SimpleItem item1 = new SimpleItem();
item1.setName("item1");
item1.setPrice(50);
itemPairList.add(new NameValuePair(item1.getName(), item1));

SimpleItem item2 = new SimpleItem();
item2.setName("item2");
item2.setPrice(120);
itemPairList.add(new NameValuePair(item2.getName(), item2));

SimpleItem item3 = new SimpleItem();
item3.setName("item3");
item3.setPrice(130);
itemPairList.add(new NameValuePair(item3.getName(), item3));

return itemPairList;
}

public void setResult(Object result) {

if (!(result instanceof SimpleItem)) {
System.out.println("it is not a SimpleItem");
}

SimpleItem item = (SimpleItem)result;
System.out.println("Item: " + item.getName() + ", Price: " + item.getPrice());
}

}

And the Item I'm going to manipulate using rule is a simple bean like this,
public class SimpleItem {
String name;
int price;
public String getName() {

return name;
}

public void setName(String name) {

this.name = name;
}

public int getPrice() {

return price;
}

public void setPrice(int price) {

this.price = price;
}
}

4. Data Adapter

You have to adapt the input and output with the rule engine. Mostly here you only have to wrap the data context. The advantage of having the data adapter is, a data adapter always associated with a input/output type. So in the rule configuration I can provide the type for the input and output. If you see my rule configuration above, you see the input/output type is marked as "ItemData". Here is my custom data adapter that is associated with the "itemData" type.
public class SimpleDataAdapter implements
ResourceAdapter, InputAdaptable, OutputAdaptable {

// the type associated with the adapter
private final static String TYPE = "itemData";
public String getType() {

return TYPE;
}

public Object adaptInput(ResourceDescription resourceDescription, Object tobeadapted) {

if (!(tobeadapted instanceof SimpleDataContext)) {
return null;
}

SimpleDataContext dataContext = (SimpleDataContext)tobeadapted;
return dataContext.getInput();
}

public boolean adaptOutput(ResourceDescription description,
Object value,
Object context,
ResourceHelper resourceHelper) {

if (!(context instanceof SimpleDataContext)) {
return false;
}

((SimpleDataContext)context).setResult(value);
return true;
}

public boolean canAdapt(ResourceDescription description, Object ouptput) {
String key = description.getKey();
return key != null && !"".equals(key);
}

}

5. Resource Helper

Resource Helper will map the keys refered from the configuration to JAVA objects. This is mostly used in mediation rule configurations which can extract the message data using a key or an xpath. In this example, we don't have much keys refering from the configuration only the rule file and the data context.
public class SimpleResourceHelper extends ResourceHelper {

public ReturnValue findByKey(String key, Object source, Object defaultValue) {

if (!(source instanceof SimpleDataContext)) {
return new ReturnValue(defaultValue);
}

SimpleDataContext dataContext = (SimpleDataContext)source;
if (key.startsWith("file:")) {

String filename = key.substring("file:".length());
try {

BufferedInputStream in = new BufferedInputStream(new FileInputStream(filename));
return new ReturnValue(in);
} catch (Exception e) {

return new ReturnValue(defaultValue);
}
}
if (key.startsWith("dataContext")) {

return new ReturnValue(dataContext);
}
return new ReturnValue(defaultValue);
}

// there are few more methods to be implemented, which can just leave not implemented for this example
}
}

That is all the accessories. Now you will be able to write the rule engine execution code.
File ruleConfigFile = new File(ruleConfigFilename);
XMLStreamReader parser = XMLInputFactory.newInstance().createXMLStreamReader(new FileInputStream(ruleConfigFile));

//create the builder
StAXOMBuilder builder = new StAXOMBuilder(parser);
//get the root element (in this case the envelope)

OMElement ruleConfig = builder.getDocumentElement();
EngineConfiguration configuration =
new EngineConfigurationFactory().create(ruleConfig, new AXIOMXPathFactory());

EngineController
engineController = new EngineController(configuration, new SimpleResourceHelper());
final ResourceAdapterFactory factory = ResourceAdapterFactory.getInstance();

ResourceAdapter adapter = new SimpleDataAdapter();
String adapterType = adapter.getType();
if (!factory.containsResourceAdapter(adapterType)) {

factory.addResourceAdapter(adapter);
}

SimpleDataContext simpleContext = new SimpleDataContext();

if (!engineController.isInitialized()) {
engineController.init(simpleContext);

}

if (engineController.isInitialized()) {
engineController.execute(simpleContext, simpleContext);

}

Wednesday, January 06, 2010

Getting the size of BLOB in MySql

If you want to store binary in database, you can use BLOB as the data type of that column. In Mysql you can use TINYBLOB, BLOB, MEDIUMBLOB, LONGBLOB depending on your space requirement. Here is an example of database table using BLOB as a column type.
CREATE TABLE BloBTest (
id INT NOT NULL AUTO_INCREMENT,
filename VARCHAR( 32 ) NOT NULL,
content BLOB NOT NULL,
PRIMARY KEY ( id )
)

Storing Data

PHP:
$filename = "myimage.png";
$filecontent = file_get_contents($filename);
$filecontent_escaped = mysql_real_escape_string($filecontent);

$sql = "INSERT INTO BloBTest(filename, content) " +
"VALUES('$filename','$filecontent_escaped')";
mysql_query($sql, $link);

Java:
String filename = "myimage.png";
InputStream filecontent = new FileInputStream(filename);

String sql = "INSERT INTO BloBTest(filename, content) VALUES(?, ?)";

int size = filecontent.available();
PreparedStatement ps = conn.prepareStatement(sql);
ps.setString(1, filename);
ps.setBinaryStream(2, filecontent, size);
ps.executeUpdate();

Retrieving Data

PHP
$sql = "SELECT filename, content FROM BloBTest";
$result = mysql_query($sql, $link);
while ($row = mysql_fetch_assoc($result)) {

$filename = $row["filename"];
$content = $row["content"];
$new_filename = "new_" . $filename;
file_put_contents($new_filename, $content);
}

Java:
String sql = "SELECT filename, content FROM BloBTest";

PrepareStatement ps = conn.prepareStatement(resourceContentSQL);
ResultSet result = ps.executeQuery();

if (result.next()){
String filename = result.getString("filename");
InputStream contentStream = result.getBinaryStream("content");
String newFilename = "new_" + filename;
// storing the input stream in the file

OutputStream out=new FileOutputStream(newFilename);
byte buf[]=new byte[1024];
int len;
while((len=contentStream.read(buf))>0)

out.write(buf,0,len);
out.close();
}

Retrieving the Size of the Blob

After you store your data as a blob, you can manipulate or query the data with some of the in-built String functions in mysql. For an example if you want to query the size of the blob you just stored, you can use OCTET_LENGTH function. Here is an example,  (this will give you the size in bytes.)
SELECT OCTET_LENGTH(content) FROM BloBTest WHERE filename='myimage.png'


.

Tuesday, January 05, 2010

Register Today for WSO2 Governance as a Service

WSO2 Governance as a Service is an online multi-tenant supported instance of WSO2 Governance Registry which is the solution for SOA Governance from the WSO2 SOA stack. You can start trying out WSO2 Governance as a Service by accessing the http://governance.cloud.wso2.com and creating an account for your organization (free for limited use).

In order to identify your account, you have to provide the domain name of your organization. I will demonstrate how to create an account using the "ws.dimuthu.org" as my domain name.

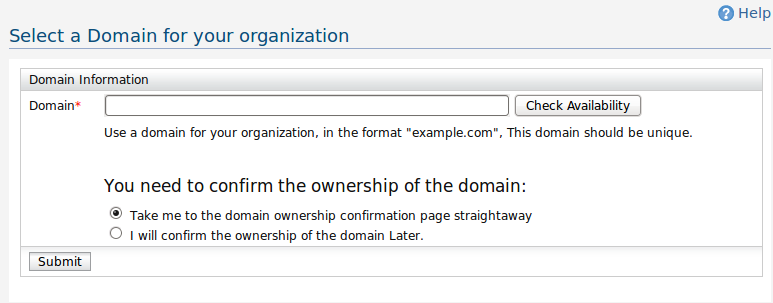
1. First go to http://governance.cloud.wso2.com from a web browser and click the 'Register' button. You will be asked to enter the domain name as the first step.

[caption id="attachment_1036" align="aligncenter" width="773" caption="Enter the domain"]Enter the domain[/caption]

After that, you have the option of validating the ownership of the domain right at the registration process, or you can skip the validation and continue to the next step in which case your domain will be appended '-trial' suffix. You can validate the ownership of the domain later at any stage.

Here I want to validate the domain right now, so I click 'Take me to the domain ownership confirmation page straight-away' and click the 'Submit' button.

2. This will redirect you to the domain ownership validation page. You can validate the ownership of your domain in one of two ways.

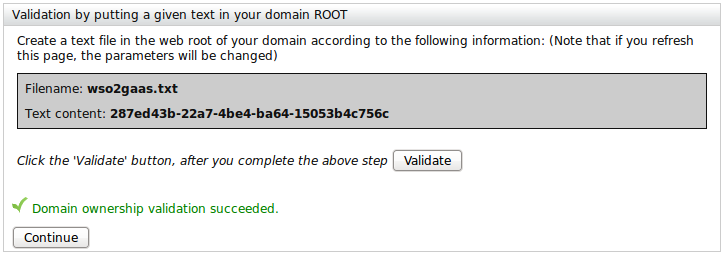
Method i). Just create a text file named 'wso2gaas.txt' in the web root of your domain and enter the given text. This is the most simplest method of two.

[caption id="attachment_1039" align="aligncenter" width="722" caption="Validate domain name using Textfile"]Validate domain name using Textfile[/caption]

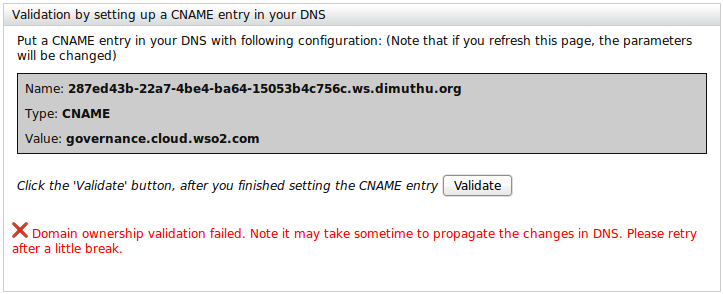
Method ii). You can put a DNS entry according to the given instructions. This is a little tedious approch to validate the domain. In fact it may take a while to propagate the new DNS information, so you may have to wait hours without refreshing the page until you finally validate the domain ownership.


Click the continue button after the domain validation done. Then you will be redirected to a page requesting more information.

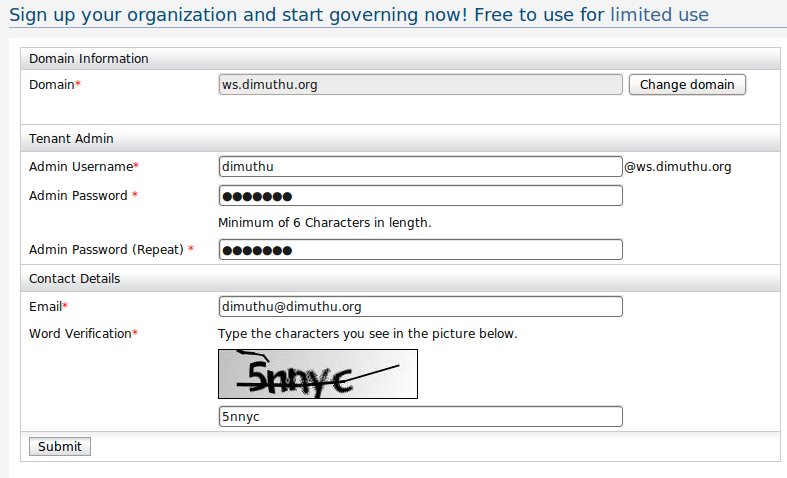
3. Tenant Registration Page

[caption id="attachment_1041" align="aligncenter" width="787" caption="Tenant Registration"]Tenant Registration[/caption]

4) After this step, you will be notified to check for your email which will contain a mail with a link to proceed with the registration. There you will be able to select a theme for your organization and finalize creating your account. Login to the admin account for your tenant with the credential you provided a the time of the registration.

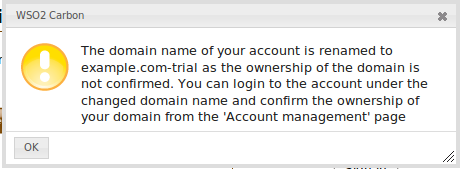
The domain ownership validation was introduced to WSO2 Governance as a Service account registration only now. So for organizations who have already have account will have a message similar to this when they are trying to login to their account.

[caption id="attachment_1046" align="aligncenter" width="460" caption="Info box at login"]Info box at login[/caption]

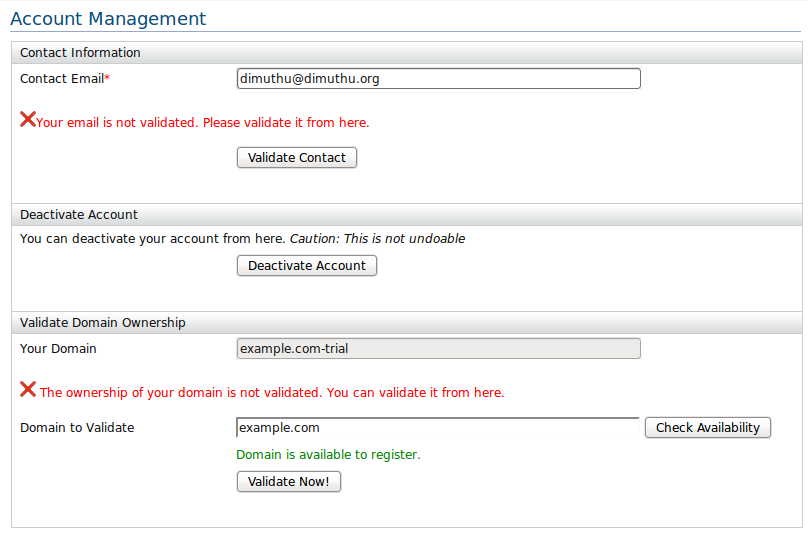
So the account I have registered using the domain name 'example.com' has been renamed to 'example.com-trial'. As the instruction of the message says you can go to the account management page after the login and validate the domain ownership.

[caption id="attachment_1043" align="aligncenter" width="808" caption="Account Management Page"]Account Management Page[/caption]

Thursday, November 19, 2009

WSO2 SOA Platform Enters in to the Cloud

WSO2 announced the launch of their SOA platform inside the Cloud earlier this week. With this launch, you can try out and use their comprehensive SOA platform inside the cloud.

WSO2 Cloud Platform consists of various products, including

Tuesday, October 13, 2009

WSO2 SOA Workshop 2009, Santa Clara, CA

WSO2 is hosting a SOA Workshop in Santa Clara, California in November 3rd 2009. You will be able to attend to the following sessions covered by the industry leading experts in SOA.

  • ESBS and SOA

  • SOA Security

  • Mashups and Business Process Management for SOA

  • SOA Governance

  • SOA with C, C++, PHP

  • SOA Architecture Pattern


Visit here to find more details about the event, http://wso2.com/events/2009-us-soa-workshop/?soaotad=10072009

WSO2 Releases Goernance Registry 3.0.1, ESB 2.1.1, WSAS 3.1.1, IS 2.0.1 AND Mashup Server 2.0.0

WSO2 announced an another round of release of their famous SOA products.

Although the version numbers say this is minor patch release (Other than the Mashup Server which is shipping as a major release), in fact there are new features and improvements. Some basic new features shares among all of these products are

  1. Improved registry level transaction Support.

  2. Improved Support for deploying on top of Application Servers other than tomcat like WebSphere, WebLogic, and
    JBoss.

  3. Support for Eclipse P2 based provisioning. (Yes, you can add/remove features from these WSO2 products , see https://wso2.org/wiki/display/carbon/p2-based-provisioning-support for more details)

  4. Improved Remote Registry model

Monday, August 24, 2009

WSO2 Releases Eclipse IDE Tooling for WSAS and BPS

Saminda Wijerathna the lead of the WSO2 tooling team, announced the release of a new version of IDE tools for WSO2 WSAS and BPS. These tools will help you to write web services or web service clients and test them within your Eclipse IDE.

You can download the tools and the related documentation from http://wso2.org/downloads/tools/eclipse.

Here are the key features of the set of IDE tools,

  • Create Web services

  • Create web service client

  • Convert WSDL 1.1 to 2.0

  • Module and service validators

  • Creating wsdl from a java class

  • Create Axis2 archives

  • Hot update a Web service

  • Debug Web services

  • Test Web services

  • Conversion of WSDL 1.1 to 2.0 can now be done vice versa as well.

  • Creating Bpel archives for deploy

  • Start WSAS 3.0.x inside Eclipse

  • Run multiple instances of WSAS inside eclipse

Wednesday, July 29, 2009

WSO2 Releases Web Service Framework For C++

WSO2 announced the release of the Web Services Framework for C++ (WSF/C++) version 2.0.0. Similar to WSF/PHP which is really popular among the PHP community, WSF/CPP is the C++ language binding for the Apache Axis2/C and the other supporting web services projects like Apache Sandesha/C, Apache Rampart/C.

With this release C++ developers will be able to write web services and web service clients to inter-op with .NET/Java/PHP or any other platform built-on web service standards. The release is shiped with a code generation tool that will be used to generate the code for skeletons and stubs from a WSDL, so developers only need to concentrate on their business logic as the generated code will take care of building or parsing xmls and running them on top of the framework.
Here are the key features of the new release.

  1. Support core web service standards like SOAP 1.1, SOAP 1.2, WSDL 1.1, WSDL 2.0, REST

  2. Support for web services QoS specifications.

    • WS-Addressing

    • WS-Security

    • WS-Policy

    • WS-Security-Policy

    • WS-Reliable-Messaging


  3. Support binary attachment with MTOM and SWA (With the Support for large binaries)

  4. Code generation tool.

  5. Proven interoperability with .NET.


As a side note, you will be able to participate to a free summer school training session on the WSF/CPP conducted by Nandika Jayawardane who is the project lead of both WSF/CPP and WSF/PHP on 30th July. You can register to it (for free) from here.

Sunday, July 12, 2009

WSO2 Governance Registry 3.0.0 - What's New?

WSO2 Governance Registry (G-Reg) (Formally known as WSO2 Registry) is released its 3.0.0 version along with two other sibling WSO2 products, WSAS 3.1.0 and ESB 2.1.0. This is a major release specially for WSO2 Governance Registry as it contain number of new features and improvements.

1. The New Name - s/Registry/Governance Registry

The product name itself changed from 'Registry' to 'Governance Registry' (abbreviated as 'G-Reg'). As it may hint you, now the product is more focused on the 'Governance' aspects than just the 'registry' or a 'repository' aspects. In early releases, it mainly used to store, retrieve configurations and persistence data that the other products would need. Now you can govern these resources (Services, Policies, Processes, People) inside the G-Reg itself. It has emerged to become a complete tool that help you in governing your SOA platform.

2. Separate Views for Add/View/Remove Services

In G-Reg 'Services' along with Service MetaData (policies, wsdls, schemas) are distinguished from other resources, as they are the key resources in a SOA platform. You will be able to add/list/view services directly from the main menu in the G-Reg UI.

[caption id="attachment_1004" align="aligncenter" width="228" caption="Add Service Metadata"]Add Service Metadata[/caption]

When adding a service you will be prompted to provide additional details on the services. As they will help users in discovering these services. The fields of these details are configurable as you will change them according to the policies and requirements of your organizations, but the defaults will be adequate for most of the scenarios.  Additionally G-Reg will do WS-I validation as you add WSDLs, Schemas.
Note that this is an additional view you will get as you can still discover services on a tree view arranged according to their namespaces using the registry browser as in previous releases.

3. Service Life cycle Management with Check-lists

Managing service lifecycle is a core part of governing services. G-Reg provides you this functionality with a simple user interface.

Life Cycle Management with Check-Lists

Lifecycle states can be promoted or demoted. The state transition can be 'Designing' -> 'Developing' -> 'Testing' -> 'Deployed'. You can enforce a validation of a checklist in promoting the state to the next level. This states and the associated check-list items are highly configurable as you will change them to suit to the process of your organizations as you wish.

And G-Reg is shipped with a sample that extend the lifecycle management functionality by making it distributed. In there as you promote or demote the state, the service resource will move its position. The user guide on 'Distributed Life Cycle Management Sample' will describe how to use this functionality in more details. This will be really useful if you are enforcing a structured permission model in managing lifecycles. For an example you can enforce only developer role will be able to modify, check or promote a service in the 'Developing' state and QA role has permission in promoting a service in 'Testing' state and so on.

4. Business Activity Monitoring (BAM)

This is a brand new feature provide in G-Reg. You may find the user guide on 'BAM' will be really helpful in configuring the servers you want to monitor. But in order to view the monitoring data you have to go to the dashboard, which is the next new feature.

5. Dashboard

For most of the you, this will be the coolest feature in the new G-Reg., an eye-catching dashboard filled with bunch of Gadgets.

[caption id="attachment_1007" align="aligncenter" width="753" caption="Dashboard"]Dashboard[/caption]

The dashboard provides you the information related to runtime governance as well as design-time governance as described in the 'Dashboard' user guide.

6. Eventing and Notifications

If you want you to notified when a resource is updated or a lifecycle state of a service is changed, this feature will be really helpful. Look at the 'Eventing and Notifications' user guide on how you can get notified and the built-in events that you can listen.

7. Mount Remote Resources - Federating Registries

If you are maintaining two separate registry instances, this feature will enable you to share resources among them. In G-Reg you can create links to resources in remote registries (remote-links) as well as to the resources in the same registry (sym-links). Here is the user guide for 'Sym Links and Remote Links' to read more details of the subject.

8. User Profiles
The new G-Reg has the ability to keep multiple user profiles per user. A simple how to on creating profiles can be found in the user guide on 'User Profiles'.

9. Checkin/Checkout with Local Filesystem

The new G-Reg is shipped with a command line tool that allows you to checkin and checkout registry resources with your local filesystem. If you are familiar with a version control system like subversion, the checkin/checkout commands will not be much difficult to you.

Checking out a resource is simple as (the following command is what you typed in linux, in windows you will use the checkin-client.bat instead).

./checkin-client.sh co / -u user -p user_pw

And to checkin,

./checkin-client.sh ci -u user -p user_pw

Similarly you can use this tool to create backups or move resource or resource hierarchy off-line. Here is a complete user guide on 'Checkin-Client'.

10. Performance Boost

Last but not least, the new G-Reg is performing very fast than its predecessor. In the performance test, it was seen each primitive operation in the registry is at least 10% faster in this release, where as some operations are performing much faster (for an example, 'Add Collection' operation seemed 50% faster). And the remote registry calls also optimized by keeping a local cache (http-level-caching).

This was a list of most notable new features in addition to the bunch of the features that was already there in the previous releases. You will be able to download WSO2 Governance Registry freely from the product website, http://wso2.org/projects/governance-registry and evaulate these features as you want.
Saturday, July 11, 2009

WSO2 Carbon 2 - WSAS, ESB & Governance Registry Released

WSO2 -An open source middleware company- announced the release of bunch of their SOA enabling products along with Carbon 2.0.0 which is an OSGI based unified platform that all the WSO2 java products are built on.

  • WSAS (Web Service Application Server) - Provide and consume web services, data services with full WS-*, REST support, GUI tools, Integration with Eclipse, etc..

  • ESB (Enterprise Service Bus) - Message routing, mediation, transformation, logging, task scheduling, load balancing, failover routing, event brokering, etc. with number of transports support

  • Governance Registry - Govern you SOA platform, introducing number of new features including Dashboard with Gadgets, lifecycle management with checklists, eventing and notifications, remote/symbolic links, checkin/checkout functionality and new meta data management UI.


You will be able to get the advantage of the carbon platform by extending the functionality of any of these products, just by mixing components from other products (Just like running an ESB within WSAS).

Download, Play around with them and Enjoy:)!!!

Sunday, July 05, 2009

JDBC Transactions And Deadlocks

Programming with Database is very challenging. It is all about you designed and normalized the database really correctly without missing any important indexing and writing the most optimized queries. In addition to that database programmer should be aware of whether the order of the queries in an execution flow will make a deadlock specially in very complex systems.
There are many guidelines that you can follow specially on avoiding (probably minimizing) deadlocks. Specially the guide "Reducing SQL Server Deadlocks" provides a checklist to reduce deadlocks in a database program.

Tuesday, June 23, 2009

Apache Stonehenge Releases First Milestone

Apache Stonehenge, A project to demonstrate the interoperability between heterogeneous platforms has done their first milestone release few days back.

The first milestone demonstrate the interoperability between

  1. .NET - Microsoft WCF implementation

  2. Java - WSO2 Web Service Application Server (WSAS) implementation

  3. PHP - WSO2 Web Service Framework for PHP (WSF/PHP) implementation


Each of these technologies has implemented a Stock trader application with Business Service, Order Processor and Trader Client components. You will be able to assemble the application by mixing components from any of the above implementations.

It provides you a great sample on using basic web services features (SOAP, WSDL etc..) and WS-Security across the above platforms.

If you are interested, you can download the sources and binaries from here, http://www.apache.org/dist/incubator/stonehenge/. Installation guides and other documentations can be found from here, http://cwiki.apache.org/STONEHENGE/

Saturday, July 19, 2008

Moving to dimuthu.org

This is not the first time I moved away from blogspot. But this time it is to a more permanent place. Yea it is to my own place with my own domain name.

Just check my new web site and the blog http://www.dimuthu.org

It sill just a blog, but hope to make it more than that in future as time permits. Hope you will be in touch with me.

Wednesday, May 21, 2008

Tutorial on Axis2/C codegen (WSDL2C) tool

Finally I managed to write a simple step by step tutorial on how to use WSDL2C tool in Axis2/C. Visit it here, http://wso2.org/library/3534.

Saturday, March 22, 2008

Axis2/C Architecture

I found a discussion on Axis2/C user list about the references where you can find information on Axis2 Architecture and Damitha in the axis2/c list have posted list of great resources. Looks like the mail achieves think it is a junk message due to the bunch of links, So I thought it is better I can publish the list here, hopefully this will be useful for future users..

Flows, Phases, Handlers and modules <http://wso2.org/library/777>
Introducing Apache Aixs2/C <http://wso2.org/library/252>
Apache Axis2/C - Web services engine <http://wso2.org/library/2406>
Web Services Endpoints with Apache Axis2/C <http://wso2.org/library/2663>
WS-Addressing in Action <http://wso2.org/library/2605>
Sine Axis2/C and Axis2/java are based on same architecture these could
also be helpful to read
How Apache Axis2 Finds the Operation and Service a Message is Destined
To <http://wso2.org/library/176>
Web services and Axis2 architecture
<http://www-128.ibm.com/developerworks/webservices/library/ws-apacheaxis2/>